Issuer
Learn how to implement the issuance of verifiable credentials from a server to a holder app using the Multipaz SDK in a secure and standards-compliant way, following the OpenID4VCI protocol. OpenID4VCI stands for OpenID Connect for Verifiable Credential Issuance, which defines an OAuth-protected API for the issuance of Verifiable Credentials.
What you’ll implement:
- OpenID4VCI credential offer handling (via app links, or custom URL schemes).
- Minimal “wallet back-end” for demo purposes to complete attestation and OAuth steps.
- A basic UI that guides users through authorization and receives issued credentials.
Create the feature/provisioning module
To create a new module: File → New → New Module → Kotlin Multiplatform Shared Module. Name it as shown in the table above and configure the package name (e.g., org.multipaz.getstarted.provisioning for feature:provisioning).
Update the build.gradle.kts file for the module:
// feature/provisioning/build.gradle.kts
plugins {
    alias(libs.plugins.composeMultiplatform)
    alias(libs.plugins.composeCompiler)
    alias(libs.plugins.kotlinSerialization)
}
kotlin {
    jvmToolchain(17)

    androidLibrary {
        @OptIn(ExperimentalKotlinGradlePluginApi::class)
        compilerOptions {
            jvmTarget.set(JvmTarget.JVM_17)
        }
    }

    sourceSets {
       commonMain.dependencies {
            implementation(project(":core"))

            implementation(libs.multipaz)
            implementation(libs.multipaz.compose)
       }
   }
}
Refer to this provisioning build.gradle.kts code for the complete example.
Also add the dependency in composeApp/build.gradle.kts:
// composeApp/build.gradle.kts
kotlin {
    sourceSets {
        commonMain.dependencies {
            // ... other dependencies
            implementation(project(":feature:provisioning"))
        }
    }
}
Refer to this composeApp build.gradle.kts code for the complete example.
Dependencies
Add Ktor HTTP client for network calls (core + platform engines). Please note that we are adding these dependencies to the :core module.
Update libs.versions.toml:
[versions]
ktor = "3.4.0"
kotlinxSerializationJson = "1.9.0"

[libraries]
ktor-client-core = { module = "io.ktor:ktor-client-core", version.ref = "ktor" }
ktor-client-java = { module = "io.ktor:ktor-client-java", version.ref = "ktor" }
ktor-client-cio = { module = "io.ktor:ktor-client-cio", version.ref = "ktor" }
ktor-client-android = { module = "io.ktor:ktor-client-android", version.ref = "ktor" }
ktor-client-darwin = { module = "io.ktor:ktor-client-darwin", version.ref = "ktor" }

kotlinx-serialization-json = { module = "org.jetbrains.kotlinx:kotlinx-serialization-json", version.ref = "kotlinxSerializationJson" }
Refer to this libs.versions.toml code for the complete example.
Update core/build.gradle.kts:
kotlin {
    sourceSets {

        androidMain.dependencies {
            // ...
            implementation(libs.ktor.client.android)
        }

        commonMain.dependencies {
            // ...
            implementation(libs.ktor.client.core)
            // CIO for JVM/Android
            implementation(libs.ktor.client.cio)
            implementation(libs.kotlinx.serialization.json)
        }

        iosMain.dependencies {
            // Darwin engine for iOS in iosMain
            implementation(libs.ktor.client.darwin)
        }

    }
}
Refer to this build.gradle.kts code for the complete example.
iOS Setup
Step 1: Configure the Info.plist file
The iOS app requires URL scheme configuration in Info.plist to handle deep links and custom URL schemes. Info.plist (Information Property List) is a configuration file that contains metadata about your iOS app, including supported URL schemes, app permissions, and other settings.
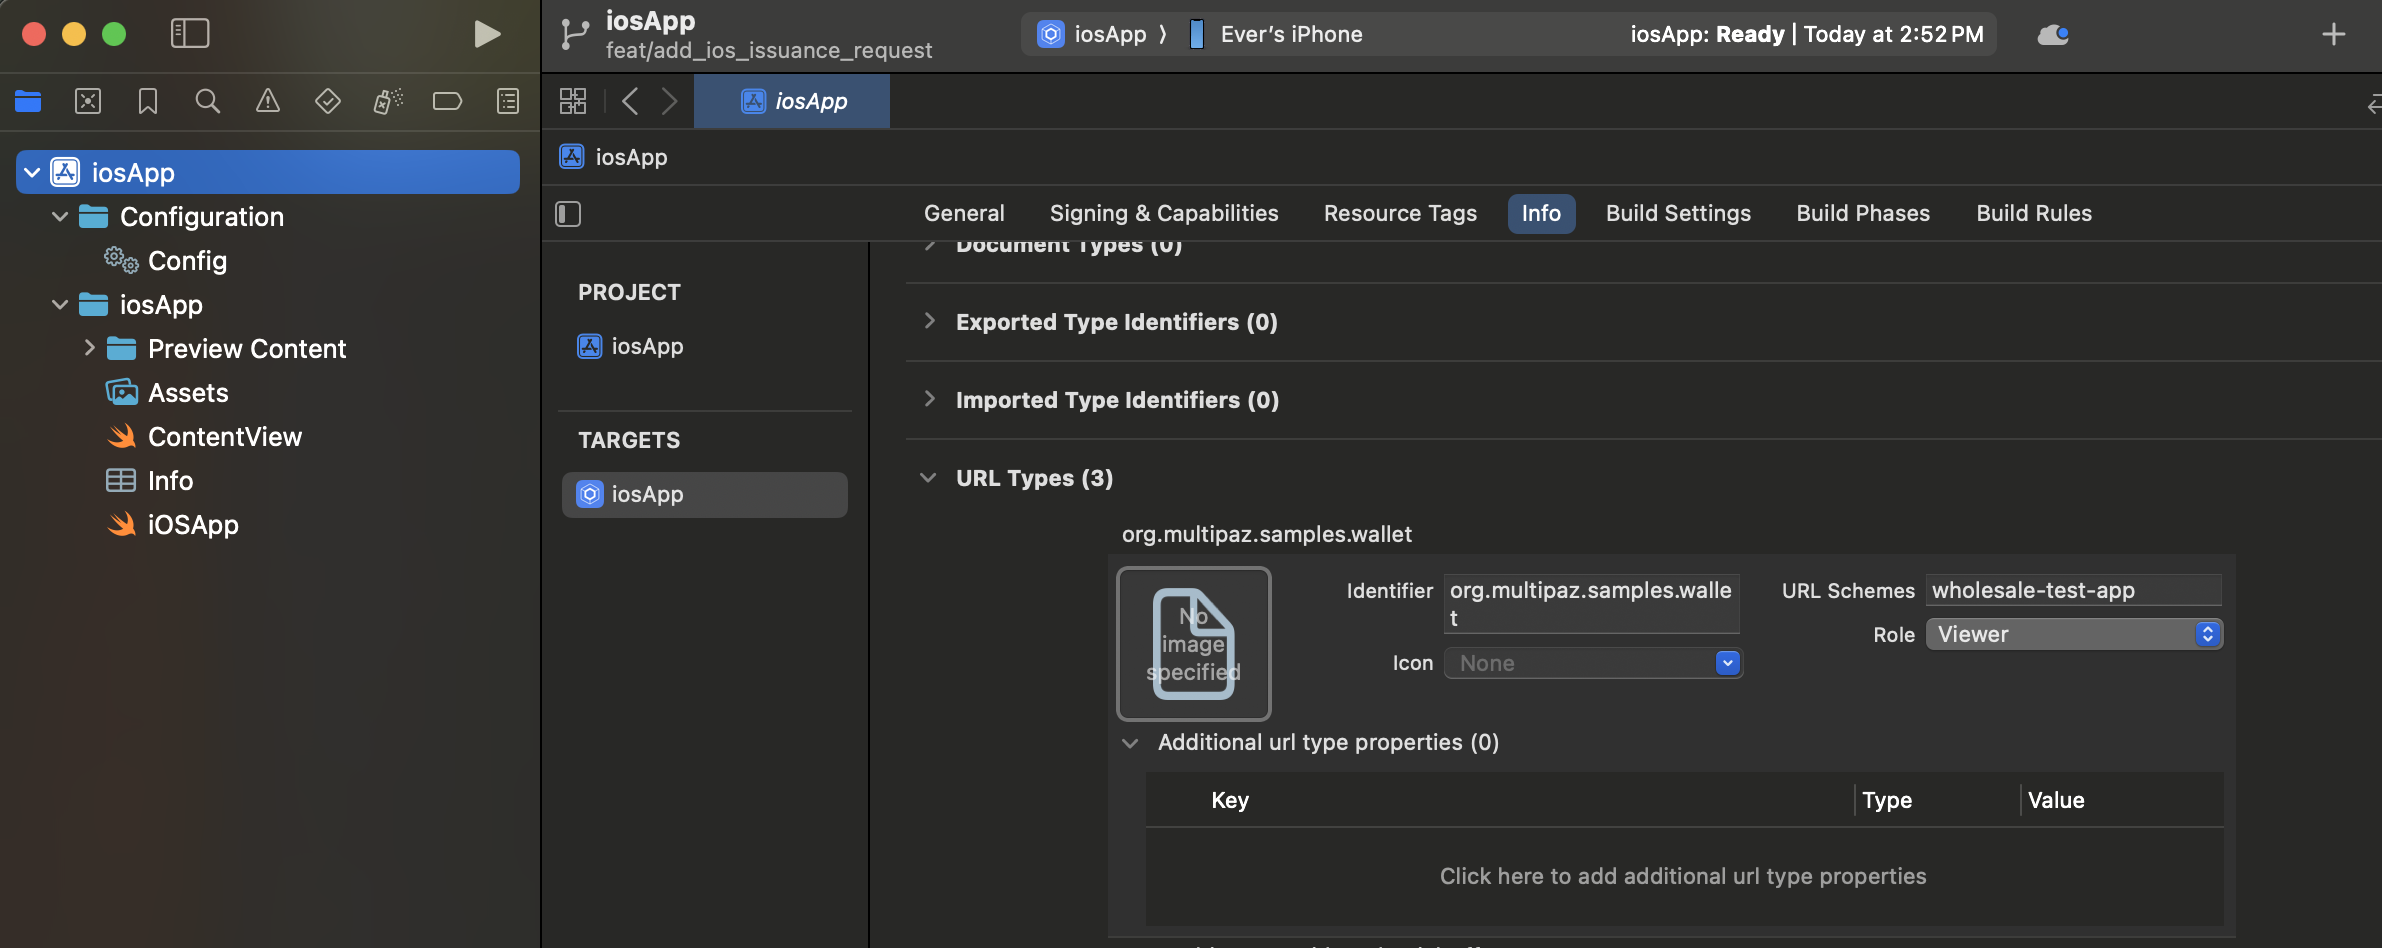
Configuring URL Types in Xcode:
You can configure URL schemes directly in Xcode using the Info tab:
- Open your iOS app target in Xcode
- Select the Info tab in the project settings
- Expand the URL Types section
- Click the + button to add a new URL Type
- Configure each URL scheme with:
- Identifier: A reverse DNS identifier (e.g.,
org.multipaz.samples.wallet) - URL Schemes: The custom scheme name (e.g.,
wholesale-test-app) - Role: Typically set to "Viewer" for custom schemes
- Identifier: A reverse DNS identifier (e.g.,
Manual Configuration (Alternative):
If you prefer to edit the XML directly, add the following to your Info.plist file:
<key>CFBundleURLTypes</key>
<array>
    <!-- Custom URL Scheme for OAuth Callbacks -->
    <dict>
        <key>CFBundleTypeRole</key>
        <string>Viewer</string>
        <key>CFBundleURLName</key>
        <string>org.multipaz.samples.wallet</string>
        <key>CFBundleURLSchemes</key>
        <array>
            <string>get-started-app</string>
        </array>
    </dict>

    <!-- OpenID Credential Offer Scheme -->
    <dict>
        <key>CFBundleTypeRole</key>
        <string>Viewer</string>
        <key>CFBundleURLName</key>
        <string>org.multipaz.openid.credential-offer</string>
        <key>CFBundleURLSchemes</key>
        <array>
            <string>openid-credential-offer</string>
        </array>
    </dict>

    <!-- HAIP Scheme -->
    <dict>
        <key>CFBundleTypeRole</key>
        <string>Viewer</string>
        <key>CFBundleURLName</key>
        <string>org.multipaz.openid.haip</string>
        <key>CFBundleURLSchemes</key>
        <array>
            <string>haip</string>
        </array>
    </dict>
</array>
Refer to this Info.plist code for the complete example.
Step 2: Configure ContentView.swift
In ContentView.swift, add the .onOpenURL modifier to handle incoming URLs:
struct ContentView: View {
    var body: some View {
        ComposeView()
            .ignoresSafeArea()
            .onOpenURL(perform: { url in
                MainViewControllerKt.HandleUrl(url: url.absoluteString)
            })
    }
}
Refer to this ContentView.swift code for the complete example.
Step 3: Implement URL Handler in MainViewController.kt
In MainViewController.kt (iOS-specific), implement the HandleUrl function:
private val app = App.getInstance()

fun MainViewController() = ComposeUIViewController {
    app.Content()
}

fun HandleUrl(url: String) {
    app.handleUrl(url)
}
Refer to this MainViewController.kt code for the complete example.
Step 4: Build and Run iOS App
To test the iOS implementation, you can follow these iOS build instructions from our Face Detection & Verification guide.
Android: Permissions and Custom URI Schemes
Issuance needs internet access and deep link handling for:
- Credential offers (e.g.,
openid-credential-offer://) - Wallet redirect/callback (custom or HTTPS app link)
Update androidMain/AndroidManifest.xml:
<!-- Networking -->
<uses-permission android:name="android.permission.INTERNET" />

<!-- Required on Android 11+ for Multipaz's OAuth flow to discover a Chrome Custom Tabs
     provider via CustomTabsClient.getPackageName() -->
<queries>
    <intent>
        <action android:name="android.support.customtabs.action.CustomTabsService" />
    </intent>
</queries>

<application ...>
    <activity
        android:name=".MainActivity"
        android:enableOnBackInvokedCallback="true"
        android:exported="true"
        android:launchMode="singleInstance">

        <intent-filter>
            <action android:name="android.intent.action.MAIN" />
            <category android:name="android.intent.category.LAUNCHER" />
        </intent-filter>

        <!-- 1) Custom URI scheme for wallet redirect (used in this sample) -->
        <!-- Example redirect: get-started-app://landing/?state=... -->
        <intent-filter>
            <action android:name="android.intent.action.VIEW" />
            <category android:name="android.intent.category.DEFAULT" />
            <category android:name="android.intent.category.BROWSABLE" />
            <data android:scheme="get-started-app" />
            <data android:host="landing" />
        </intent-filter>

        <!-- 2) Credential Offer schemes (OpenID4VCI, HAIP) -->
        <!-- Allows scanning/handling credential offer URLs -->
        <intent-filter>
            <action android:name="android.intent.action.VIEW" />
            <category android:name="android.intent.category.DEFAULT" />
            <category android:name="android.intent.category.BROWSABLE" />
            <data android:scheme="openid-credential-offer" />
            <data android:scheme="haip" />
            <data android:host="*" />
        </intent-filter>

        <!-- Alternative (recommended for production): HTTPS App Links
             Requires .well-known/assetlinks.json on your domain.
             See comments in the patch for details. -->
        <!--
        <intent-filter android:autoVerify="true">
            <action android:name="android.intent.action.VIEW" />
            <category android:name="android.intent.category.DEFAULT" />
            <category android:name="android.intent.category.BROWSABLE" />
            <data
                android:host="getstarted.multipaz.org"
                android:pathPattern="/landing/.*"
                android:scheme="https" />
        </intent-filter>
        -->
    </activity>
</application>
Refer to this AndroidManifest.xml code for the complete example.
Choosing a link strategy
There are two ways to route back to your app after authorization:
- Custom URI scheme (used in this sample)
- Example:
get-started-app://landing/?state=... - Pros: Simple to set up for demos and codelabs; no server config needed.
- Cons: Cannot be initiated by the server; when multiple apps register the same scheme, Android may present a chooser or misroute the intent. This can conflict with scenarios where Test App and Getting Started Sample App are both installed.
- Example:
- HTTPS App Links (preferred for production)
- Pros: Verifiable, secure, server-initiated, avoids intent-misrouting when multiple apps are installed.
- Requirements:
- Host an Digital Asset Links file at
https://<your-domain>/.well-known/assetlinks.jsoncontaining your Android package name and signing cert SHA-256. - Add an Android
VIEWintent filter withandroid:autoVerify="true"for your HTTPS domain and path.
- Host an Digital Asset Links file at
Recommendation: Use custom schemes for development, switch to HTTPS App Links for production.
Deep Link Handling in Activity
Handle incoming URLs (Intents) in MainActivity and forward them to the app logic:
androidMain/MainActivity.kt
class MainActivity : FragmentActivity() {

    override fun onCreate(savedInstanceState: Bundle?) {
        // ...
        setContent { /* ... */ }
        handleIntent(intent)
    }

    override fun onNewIntent(intent: Intent) {
        super.onNewIntent(intent)
        setIntent(intent)
        handleIntent(intent)
    }

    private fun handleIntent(intent: Intent) {
        if (intent.action == Intent.ACTION_VIEW) {
            val url = intent.dataString ?: return
            lifecycle.coroutineScope.launch {
                val app = App.getInstance()
                app.init()
                app.handleUrl(url)
            }
        }
    }
}
Refer to this MainActivity.kt code for the complete example.
Initialize Issuance in App
- Add provisioning fields, initialize ProvisioningModel & ProvisioningSupport.
In the modularized sample, ProvisioningSupport and ProvisioningScreen live in the feature/provisioning module. The App class delegates to AppContainer for shared infrastructure:
// composeApp/src/commonMain/kotlin/.../App.kt
class App {
    private val container = AppContainer.getInstance()
    private val credentialOffers = Channel<String>()

    lateinit var provisioningModel: ProvisioningModel
    lateinit var provisioningSupport: ProvisioningSupport

    suspend fun init() {
        if (isInitialized) return

        container.init()

        provisioningModel = ProvisioningModel(
            documentProvisioningHandler = DocumentProvisioningHandler(
                documentStore = container.documentStore,
                secureArea = container.secureArea
            ),
            httpClient = HttpClient(httpClientEngineFactory) {
                followRedirects = false
            },
            promptModel = AppContainer.promptModel,
            authorizationSecureArea = container.secureArea
        )
        provisioningSupport = ProvisioningSupport(
            storage = container.storage,
            secureArea = container.secureArea,
        )
        provisioningSupport.init()

        isInitialized = true
    }
}
Refer to this initialization code for the complete example.
- Add URL handling for credential offers and app links:
class App {
    companion object {
        private const val OID4VCI_CREDENTIAL_OFFER_URL_SCHEME = "openid-credential-offer://"
        private const val HAIP_URL_SCHEME = "haip://"
        private const val ISSUER_URL = "https://issuer.multipaz.org/"
        // ...
    }

    /** Parse URLs from Activity and route them to either provisioning or app-link flow */
    fun handleUrl(url: String) {
        if (url.startsWith(OID4VCI_CREDENTIAL_OFFER_URL_SCHEME)
            || url.startsWith(HAIP_URL_SCHEME)
        ) {
            val queryIndex = url.indexOf('?')
            if (queryIndex >= 0) {
                CoroutineScope(Dispatchers.Default).launch {
                    credentialOffers.send(url)
                }
            }
        } else if (url.startsWith(ProvisioningSupport.APP_LINK_BASE_URL)) {
            CoroutineScope(Dispatchers.Default).launch {
                provisioningSupport.processAppLinkInvocation(url)
            }
        }
    }
}
Refer to this URL handling code for the complete example.
- Wire the issuance loop and provisioning bottom sheet in
Content()composable:
Multipaz provides a built-in ProvisioningBottomSheet composable that handles the entire provisioning UI — no custom ProvisioningScreen is needed. The bottom sheet automatically displays provisioning progress, handles authorization redirects, and shows success/error states.
class App {
    @Composable
    fun Content() {
        // ...

        val provisioningState = provisioningModel.state.collectAsState().value

        LaunchedEffect(
            navController.currentDestination,
            provisioningState
        ) {

            // update the refresh hook with the credential issuance completion trigger
            val shouldRefresh =
                navController.currentDestination != null
                    || provisioningState is ProvisioningModel.CredentialsIssued

            if (shouldRefresh) {
                val currentDocuments = container.listDocuments()
                if (currentDocuments.size != documents.size) {
                    documents.clear()
                    documents.addAll(currentDocuments)
                }
            }
        }

        // Listen for credential offers and launch OID4VCI flow
        LaunchedEffect(true) {
            if (!provisioningModel.isActive) {
                while (true) {
                    val credentialOffer = credentialOffers.receive()
                    provisioningModel.launchOpenID4VCIProvisioning(
                        offerUri = credentialOffer,
                        clientPreferences = provisioningSupport.getOpenID4VCIClientPreferences(),
                        backend = provisioningSupport.getOpenID4VCIBackend()
                    )
                }
            }
        }

        MaterialTheme {
            Surface {
                NavHost {
                    composable<Destination.HomeDestination> {
                        /* HomeScreen() invocation*/
                    }
                }

                ProvisioningBottomSheet(
                    provisioningModel = provisioningModel,
                    clientPreferences = CompletableDeferred(provisioningSupport.getOpenID4VCIClientPreferences()),
                    backend = CompletableDeferred(provisioningSupport.getOpenID4VCIBackend()),
                    waitForRedirectLinkInvocation = { state ->
                        provisioningSupport.waitForAppLinkInvocation(state)
                    }
                )
            }
        }
    }
}
The ProvisioningBottomSheet composable is placed outside the NavHost — it overlays the current screen as a bottom sheet when provisioning is active, and dismisses automatically when complete. clientPreferences and backend are passed as kotlinx.coroutines.CompletableDeferred so the bottom sheet can suspend until the wallet back-end is ready.
Refer to this UI implementation code for the complete example.
- Implement
httpClientEngineFactoryinPlatform.kt
// core/src/commonMain/kotlin/.../core/Platform.kt
expect val httpClientEngineFactory: HttpClientEngineFactory<*>
See the commonMain/Platform.kt file for the complete implementation.
Android Implementation
// core/src/androidMain/kotlin/.../core/Platform.kt
actual val httpClientEngineFactory: HttpClientEngineFactory<*> by lazy {
    Android
}
See the androidMain/Platform.kt file for the complete implementation.
iOS Implementation
// core/src/iosMain/kotlin/.../core/Platform.kt
actual val httpClientEngineFactory: HttpClientEngineFactory<*> by lazy {
    Darwin
}
See the iosMain/Platform.kt file for the complete implementation.
- Add a button to the Multipaz Issuer Website
The "Issue an mDoc" button lives in the DocumentSection introduced in the document management guide, right below the credential carousel. We expose an onIssueClicked callback from DocumentSection and let HomeScreen open the issuer URL:
@Composable
fun HomeScreen(
    // ...
) {
    val uriHandler = LocalUriHandler.current

    Scaffold(/* ... */) { innerPadding ->
        Column(/* ... */) {
            DocumentSection(
                container = container,
                onIssueClicked = { uriHandler.openUri("https://issuer.multipaz.org") },
            )

            // PresentmentSection(...)
        }
    }
}

@Composable
private fun DocumentSection(
    container: AppContainer,
    onIssueClicked: () -> Unit,
) {
    SectionCard(title = "Your wallet", /* ... */) {
        // ... credential carousel from the document management guide

        // button to redirect to the issuer
        FilledTonalButton(
            modifier = Modifier.fillMaxWidth(),
            onClick = onIssueClicked,
        ) {
            Text(
                buildAnnotatedString {
                    withStyle(style = SpanStyle(fontSize = 14.sp)) {
                        append("Issue an mDoc from the server")
                    }
                    withStyle(style = SpanStyle(fontSize = 12.sp)) {
                        append("\nhttps://issuer.multipaz.org")
                    }
                },
                textAlign = TextAlign.Center
            )
        }
    }
}
Refer to this code from HomeScreen.kt for the full implementation
ProvisioningSupport & OpenID4VCILocalBackend
The sample includes ProvisioningSupport (to imitate OpenID4VCI wallet back-end) and OpenID4VCILocalBackend (an in-app implementation of OpenID4VCIBackend).
OpenID4VCILocalBackend is used to sign:
- Client assertions (for token exchange)
- Wallet attestation JWT
- Key attestation JWT
ProvisioningSupport also coordinates the app-link redirect callback using a simple state→channel map.
Important: This is for development and testing only. Do not embed keys in production apps. In production, implement OpenID4VCIBackend on your server.
Highlights:
ProvisioningSupportmanages app-link OAuth callbacks using a state-channel, and an instance of `:waitForAppLinkInvocation(state)processAppLinkInvocation(url)getOpenID4VCIClientPreferences()getOpenID4VCIBackend()
class ProvisioningSupport(
    val storage: Storage,
    val secureArea: SecureArea,
) {
    companion object {
        // Custom URI Scheme used for app redirection in this sample.
        const val APP_LINK_SERVER = "get-started-app"
        const val APP_LINK_BASE_URL = "$APP_LINK_SERVER://landing/"

        // Alternative HTTP App Links (more secure)
        // const val APP_LINK_SERVER = "https://getstarted.multipaz.org"
        // const val APP_LINK_BASE_URL = "$APP_LINK_SERVER/landing/"
    }

    // Wait for wallet redirect: state is provided by the issuer during OAuth
    private val lock = Mutex()
    private val pendingLinksByState = mutableMapOf<String, SendChannel<String>>()

    // Instances of backend and client preferences used for provisioning
    private lateinit var backend: OpenID4VCIBackend
    private lateinit var preferences: OpenID4VCIClientPreferences

    suspend fun init() {
        this.backend = OpenID4VCILocalBackend()

        preferences = OpenID4VCIClientPreferences(
            clientId = withContext(RpcAuthClientSession()) {
                backend.getClientId()
            },
            redirectUrl = APP_LINK_BASE_URL,
            locales = listOf("en-US"),
            signingAlgorithms = listOf(Algorithm.ESP256, Algorithm.ESP384, Algorithm.ESP512)
        )
    }

    suspend fun processAppLinkInvocation(url: String) {
        val state = Url(url).parameters["state"] ?: ""
        lock.withLock {
            pendingLinksByState.remove(state)?.send(url)
        }
    }

    suspend fun waitForAppLinkInvocation(state: String): String {
        val channel = Channel<String>(Channel.RENDEZVOUS)
        lock.withLock { pendingLinksByState[state] = channel }
        return channel.receive()
    }

    fun getOpenID4VCIClientPreferences(): OpenID4VCIClientPreferences = preferences

    fun getOpenID4VCIBackend(): OpenID4VCIBackend = backend
}
You can refer to the full ProvisioningSupport file here.
OpenID4VCILocalBackendimplements:createJwtClientAssertion(authorizationServerIdentifier: String): StringcreateJwtWalletAttestation(keyAttestation: KeyAttestation): StringcreateJwtKeyAttestation(credentialKeyAttestations: List<CredentialKeyAttestation>, challenge: String): String
class OpenID4VCILocalBackend : OpenID4VCIBackend {
    // Sign a JWT client assertion for token endpoint
    override suspend fun createJwtClientAssertion(authorizationServerIdentifier: String): String { /* loads JWK, signs JWT */ }

    // Sign wallet attestation JWT (draft-ietf-oauth-attestation-based-client-auth)
    override suspend fun createJwtWalletAttestation(keyAttestation: KeyAttestation): String { /* signs with attestation key */ }

    // Sign key attestation JWT covering ephemeral public keys
    override suspend fun createJwtKeyAttestation(
        credentialKeyAttestations: List<CredentialKeyAttestation>,
        challenge: String,
        userAuthentication: List<String>?,
        keyStorage: List<String>?
    ): String { /* signs with attestation key */ }

    companion object {
        /* hardcoded JWKs, keys, and client ID */
    }
}
You can copy-paste the OpenID4VCILocalBackend file for the complete implementation.
Wallet back end vs Issuer
- Wallet back end (OpenID4VCIBackend)
- Owned and operated by the Wallet App developer.
- Creates signed artifacts the issuer will trust:
- Client assertion (JWT) to authenticate to a token endpoint.
- Wallet attestation (JWT) binding the wallet to attested keys.
- Key attestation (JWT) for ephemeral public keys plus nonce.
- In this sample, it is mocked in-app for development. In production, implement this on your own server.
- Issuer (e.g.,
issuer.multipaz.org)- Operates OpenID4VCI endpoints: Authorization, Token, Credential Issuance, etc.
- Verifies the wallet back end’s signed artifacts and issues credentials to the wallet.
- You can refer to this document and this diagram for more info on the wallet backend
For local testing, the sample loads hardcoded keys (do not ship these in production; move to a backend). These are cached in-memory and used to produce compact JWTs with COSE-encoded signatures.
How issuance works (end-to-end)
- Scan or open a credential offer link like
openid-credential-offer://?credential_offer=... Appdetects credential offers and sends them toProvisioningModel.launchOpenID4VCIProvisioning(...)- The model requests a backend:
- Client assertion JWT
- Wallet attestation JWT
- Key attestation JWT
- User is redirected to the issuer’s authorization page in the browser
- Issuer redirects back to the app via
get-started-app://landing/?state=... ProvisioningSupportwakes the waiting challenge with the invoked redirect URL- The model requests and stores issued credentials in
DocumentStore - The UI lists issued documents
- A credential offer URL is received:
- As an OpenID4VCI link:
openid-credential-offer://?...
- As an OpenID4VCI link:
MainActivityreceives the VIEW intent and callsApp.handleUrl(url)- For credential offers,
Appenqueues the URL tocredentialOffers, which triggers:ProvisioningModel.launchOpenID4VCIProvisioning(...)with client preferences and back-end.
- For OAuth flows, the sample launches the system browser and waits for the app-link callback to the app; the URL is passed back into ProvisioningModel via
AuthorizationResponse.OAuth(...).- This will be an HTTPS app link of the form
https://apps.multipaz.org/landing/?...
- This will be an HTTPS app link of the form
- Once authorized, credentials are issued and stored in the DocumentStore.
Testing
- Use a credential offer from issuer.multipaz.org for any document
- Multipaz getting started sample app will get triggered
- The in-app provisioning screen will:
- Launch the browser for OAuth when needed.
- Upon selecting the appropriate user id (in our case for testing), you’ll get redirected again to the app again
- Wait for the app-link callback and continue.
- Display progress (Connected, Authorized, Requesting credentials, etc.).
- Launch the browser for OAuth when needed.
- After issuance, your credential appears in the app’s DocumentStore and is ready for presentment.
- You can see the new doc in the list of documents in the UI on the next app
Production Notes
- Keys and secrets
- Do not embed private keys in the client. Implement
OpenID4VCIBackendon your server. - Replace
CLIENT_IDand redirect URL with your own values. - Generate your own keys and attestation materials.
- Do not embed private keys in the client. Implement
- Use App links
- Host a Digital Asset Links file at
https://<your-domain>/.well-known/assetlinks.jsoncontaining your Android package name and signing cert SHA-256. - Add an Android
VIEWintent filter withandroid:autoVerify="true"for your HTTPS domain and path. - Example
assetlinks.jsonfile:
- Host a Digital Asset Links file at
[
  {
    "relation": ["delegate_permission/common.handle_all_urls"],
    "target": {
      "namespace": "android_app",
      "package_name": "org.multipaz.getstarted",
      "sha256_cert_fingerprints": [
        "AA:BB:CC:...:ZZ" // replace with your app's signing cert SHA-256
      ]
    }
  }
]
- Get the SHA-256 fingerprint using
keytool -list -v -keystore <path-to-keystore>
- Make sure your redirect URL matches your manifest filter, e.g.
https://getstarted.multipaz.org/landing/…consistently across:- Issuer configuration
- App’s
ProvisioningSupport.APP_LINK_BASE_URL - Manifest HTTPS intent filter
By following these steps, you’ve added OpenID4VCI-based credential issuance to the Multipaz Getting Started Sample, including URL handling, a minimal back-end for testing, and a simple authorization UI.