Zero-Knowledge Proof (ZKP) Verification
This guide builds on top of the completed Native Verification (W3C DC API) guide, which itself builds on the Getting Started app. Please make sure you have a working native to native W3C DC flow before continuing.
In the Native Verification guide, the wallet answers a reader request by disclosing the signed mdoc for the requested data elements. Zero-Knowledge Proofs let the wallet go one step further: instead of handing over the credential (and the issuer's signature over it), the wallet returns a cryptographic proof that the credential satisfies the request - for example, that age_over_18 is true - without revealing the underlying attributes, the portrait, or even the raw signed mdoc.
Multipaz ships this capability as the Longfellow ZK system in the multipaz-longfellow module, with the proving circuits bundled in. This guide wires it into the Getting Started sample so the app can present a ZK-enabled age-over-18 proof side by side with the regular mDL request.
How It Works
A regular W3C DC request and a ZK request share the same transport (the W3C Digital Credentials API and OpenID4VP); the difference is what travels in each direction:
| Regular request | ZK request | |
|---|---|---|
| Reader advertises | claims to disclose | claims + supported ZK system specs |
| Wallet returns | signed mdoc + requested data elements | a zero-knowledge proof over the requested predicate |
| Verifier learns | the disclosed values and the issuer signature | only that the predicate holds (e.g. age_over_18 == true) |
For this to work, three things need to line up:
- The wallet must register a ZK system (Longfellow) so it can generate proofs.
- The wallet must hold a credential small enough to be proven. The proof is generated over the whole signed mdoc, and its Mobile Security Object (MSO) carries a
valueDigestfor every element the issuer signed — not just the ones being disclosed. A full mDL's MSO exceeds the size the Longfellow's proving circuits bundled with Multipaz can currently handle, so a leaner credential is issued with fewer elements (or this can be achieved normally with a credential type with fewer number of elements - eg. Age Verification, Photo ID). - The reader must advertise the ZK system specs it supports in its request, and verify the returned proof against the same system.
The rest of this guide implements each piece.
Implementation Steps
1. Add the Longfellow dependency
Add the multipaz-longfellow library to libs.versions.toml:
gradle/libs.versions.toml
[libraries]
multipaz-longfellow = { group = "org.multipaz", name = "multipaz-longfellow", version.ref = "multipaz" }
The ZK system is used on both the holder side (to generate proofs) and the reader side (to verify them), so add the dependency to both the :core and :feature:verification modules:
// core/build.gradle.kts
kotlin {
    sourceSets {
        commonMain.dependencies {
            // ... other dependencies
            implementation(libs.multipaz.longfellow)
        }
    }
}
// feature/verification/build.gradle.kts
kotlin {
    sourceSets {
        commonMain.dependencies {
            // ... other dependencies
            implementation(libs.multipaz.longfellow)
        }
    }
}
Refer to the core build.gradle.kts and the verification build.gradle.kts for the complete examples.
2. Register the Longfellow ZK System
The wallet needs a ZkSystemRepository that knows how to produce zero-knowledge proofs. Expose it on the AppContainer so both the presentment source and the verification screen can reach it.
Add the property to the AppContainer interface (in the core module):
// core/src/commonMain/kotlin/.../core/AppContainer.kt
import org.multipaz.mdoc.zkp.ZkSystemRepository

interface AppContainer {
    // ... rest of the properties

    val zkSystemRepository: ZkSystemRepository
}
Then build it in AppContainerImpl.
// core/src/commonMain/kotlin/.../core/AppContainerImpl.kt
import org.multipaz.mdoc.zkp.ZkSystemRepository
import org.multipaz.mdoc.zkp.longfellow.LongfellowZkSystem

class AppContainerImpl : AppContainer {
    // ...
    override lateinit var zkSystemRepository: ZkSystemRepository

    override suspend fun init() {
        if (isInitialized) return

        // ... storage, document store, trust manager initialization

        // Register the Longfellow ZK system so the wallet can answer reader requests with a
        // zero-knowledge proof instead of disclosing the raw mdoc. addDefaultCircuits() loads the
        // proving circuits bundled in multipaz-longfellow.
        zkSystemRepository = ZkSystemRepository().apply {
            add(LongfellowZkSystem().apply { addDefaultCircuits() })
        }

        presentmentSource = SimplePresentmentSource(
            // ... pass ZK repository object here
            zkSystemRepository = zkSystemRepository,
        )

        // ...
        isInitialized = true
    }
}
What does this do?
ZkSystemRepositoryis the registry of ZK systems the wallet supports; here it holds a singleLongfellowZkSystem.addDefaultCircuits()loads the default circuits recommended by the Longfellow authors.- Passing
zkSystemRepositorytoSimplePresentmentSourceis what allows the wallet to match a reader's ZK request against a circuit and generate a proof at presentment time.
Refer to this code from AppContainer.kt and AppContainerImpl.kt for the complete implementation.
3. Provision a ZK-compatible credential
Longfellow generates the proof over the whole signed mdoc, and the bundled proving circuits can only accommodate an mdoc up to a certain size. A full mDL is too large, so we issue a dedicated, leaner credential that carries just the elements the age-over-18 demo needs. This sits alongside the full mDL created in the Creation of an mDoc guide.
The limiting factor is the mdoc's Mobile Security Object (MSO). The MSO holds a valueDigest for every element the issuer signed, not just the elements being disclosed — and it is signed at issuance, so it cannot be trimmed at presentation time. A full mDL signs enough elements that its MSO overflows the proving circuit. Hence we mint a credential with fewer signed elements, which is why this step provisions a second document rather. The specific element list below is a demo choice; what matters is that the resulting MSO stays within the circuit's size limit.
First, add a display name for the ZK credential in CredentialDomains:
// core/src/commonMain/kotlin/.../core/CredentialDomains.kt
object CredentialDomains {
    // ...
    const val SAMPLE_DOCUMENT_DISPLAY_NAME = "Erika's Driving License"
    const val SAMPLE_DOCUMENT_TYPE_DISPLAY_NAME = "Utopia Driving License"
    const val ZKP_DOCUMENT_TYPE_DISPLAY_NAME = "Utopia Driving License (ZK Compatible)"
}
Then, in the document-creation block of AppContainerImpl.init(), create the ZK-compatible credential after the regular mDL.
// core/src/commonMain/kotlin/.../core/AppContainerImpl.kt
if (documentStore.listDocuments().isEmpty()) {

    // ... creation of the regular mDL from the Getting Started guide

    // A ZK-compatible credential limited to the attributes the ZK circuits cover
    val zkpDocument = documentStore.createDocument(
        displayName = CredentialDomains.SAMPLE_DOCUMENT_DISPLAY_NAME,
        typeDisplayName = CredentialDomains.ZKP_DOCUMENT_TYPE_DISPLAY_NAME,
    )
    DrivingLicense.getDocumentType().createMdocCredentialWithSampleData(
        document = zkpDocument,
        secureArea = secureArea,
        createKeySettings = createKeySettings,
        dsKey = dsKeyCertified,
        signedAt = signedAt,
        validFrom = validFrom,
        validUntil = validUntil,
        domain = CredentialDomains.MDOC_USER_AUTH,
        includeElement = { namespaceName, dataElement ->
            setOf(
                "age_over_18",
                "age_over_21",
                "portrait",
                "given_name",
                "family_name",
                "birth_date",
            ).contains(dataElement.attribute.identifier)
        }
    )
}
What does this do?
- The trailing lambda passed to
createMdocCredentialWithSampleData(...)is a filter over sample data elements (includeElement: (namespaceName: String, dataElement: MdocDataElement) -> Boolean) - only the listed data elements are bundled into the credential. - Both documents are created only when the store is empty to prevent proliferation, mirroring the guard used in the original creation step.
Refer to this code from AppContainerImpl.kt for the complete implementation.
4. Request a ZK proof from the reader side
The Native Verification guide introduced W3CDCCredentialsRequestButton for a plain mDL request. We extend it so the same button can drive a ZK request when useZkp is set.
The document type ships a canned request with the id age_over_18_zkp (it sets mdocUseZkp = true). We select that request when useZkp is true, and pass the ZkSystemRepository through:
// verification/W3CDCCredentialsRequestButton.kt
private const val ZKP_REQUEST_ID = "age_over_18_zkp"

@OptIn(ExperimentalTime::class)
@Composable
fun W3CDCCredentialsRequestButton(
    // ... add the following attributes
    zkSystemRepository: ZkSystemRepository,
    useZkp: Boolean = false,
) {
    val coroutineScope = rememberUiBoundCoroutineScope { promptModel }

    // Pick the ZK canned request (age_over_18_zkp) when requesting a proof,
    // otherwise the first regular mDL request.
    val selectedRequest = remember(useZkp) {
        val documentType = DrivingLicense.getDocumentType()
        if (useZkp) {
            documentType.cannedRequests.first { it.id == ZKP_REQUEST_ID }
        } else {
            documentType.cannedRequests.first()
        }
    }

    Button(
        modifier = modifier,
        onClick = {
            coroutineScope.launch {
                // ... reader root / reader key initialization (unchanged from the Native Verification guide)

                try {
                    doDcRequestFlow(
                        appReaderKey = readerKey,
                        request = selectedRequest,
                        zkSystemRepository = zkSystemRepository,
                        readerTrustManager = readerTrustManager,
                        useZkp = useZkp,
                        showResponse = showResponse
                    )
                } catch (error: Throwable) {
                    Logger.e(TAG, "Error requesting credentials", error)
                }
            }
        }
    ) {
        Text(text = text, textAlign = TextAlign.Center)
    }
}
Now update doDcRequestFlow to build a ZK-aware, signed request.
// verification/W3CDCCredentialsRequestButton.kt
@OptIn(ExperimentalTime::class)
private suspend fun doDcRequestFlow(
    // ... add the following attributes
    useZkp: Boolean,
    zkSystemRepository: ZkSystemRepository,
) {
    // ... build the claims list from request.mdocRequest (unchanged)

    val dcRequestObject = VerificationUtil.generateDcRequestMdoc(
        // ...and advertise the ZK systems we support when requesting a proof.
        zkSystemSpecs = if (useZkp) zkSystemRepository.getAllZkSystemSpecs() else emptyList()
    )

    // ... send via DigitalCredentials.getDefault().request(...), decrypt and dispatch
    //     the response exactly as in the Native Verification guide
}
What does this do?
SingleDocumentCannedRequestwith theage_over_18_zkpid carriesmdocUseZkp = true, so the wallet knows the reader is willing to accept a proof.getAllZkSystemSpecs()returns the specs (system name + circuit hash + attribute count) the reader can verify. The wallet matches these against the credential and picks a compatible circuit.
Refer to this code from W3CDCCredentialsRequestButton.kt for the complete implementation.
5. Verify the ZK proof on the response side
When the wallet returns a proof, the reader validates it against the same ZK system it advertised. The ShowResponseScreen from the Native Verification guide takes the ZkSystemRepository and threads it into verification:
// verification/ShowResponseScreen.kt
@Composable
fun ShowResponseScreen(
    // ...
    zkSystemRepository: ZkSystemRepository?,
) {
    // ...
    verificationResult.value = parseResponse(
        // ...
        zkSystemRepository = zkSystemRepository,
    )
    // ...
}

private suspend fun parseResponse(
    // ...
    zkSystemRepository: ZkSystemRepository?
): VerificationResult {
    // ...
    val presentation = VerificationUtil.verifyOpenID4VPResponse(
        // ...
        zkSystemRepository = zkSystemRepository, // was `null` in the plain flow
    )
    // ...
}
What does this do?
- Passing
zkSystemRepositorytellsverifyOpenID4VPResponseto validate a returned proof against the matching circuit. - If the response is a regular mdoc disclosure, this path is unaffected - the repository is simply unused.
Refer to this code from ShowResponseScreen.kt for the complete implementation.
6. Wire the two buttons into the UI
In the PresentmentSection of HomeScreen (see the Presentation guide), present the two requests side by side - the regular mDL request and the ZK age-over-18 request. Both share the same showResponse navigation callback:
// composeApp/src/commonMain/kotlin/.../HomeScreen.kt

// W3C Digital Credentials API is only available on Android
if (isAndroid() && documents.isNotEmpty()) {
    Row(/* ... */) {

        // ... add a new button
        W3CDCCredentialsRequestButton(
            modifier = Modifier.weight(1f),
            promptModel = AppContainer.promptModel,
            storageTable = container.storageTable,
            readerTrustManager = container.readerTrustManager,
            zkSystemRepository = container.zkSystemRepository,
            useZkp = true,
            text = buildAnnotatedString {
                withStyle(style = SpanStyle(fontSize = 14.sp)) {
                    append("W3CDC Request (ZKP)")
                }
                withStyle(style = SpanStyle(fontSize = 12.sp)) {
                    append("\nAge over 18")
                }
            },
            showResponse = showResponse
        )
    }
}
Finally, pass the ZkSystemRepository to ShowResponseScreen where the navigation destination is handled in App.kt:
// composeApp/src/commonMain/kotlin/.../App.kt
class App {
    @Composable
    fun Content() {
        MaterialTheme(colorScheme = colorScheme) {
            Surface {
                NavHost(/* ... */) {
                    composable<ShowResponseDestination> { backStackEntry ->
                        ShowResponseScreen(
                            // ...
                            zkSystemRepository = container.zkSystemRepository,
                        )
                    }
                }
            }
        }
    }
}
Refer to this code from HomeScreen.kt and App.kt for the full implementation.
Testing the ZK Flow
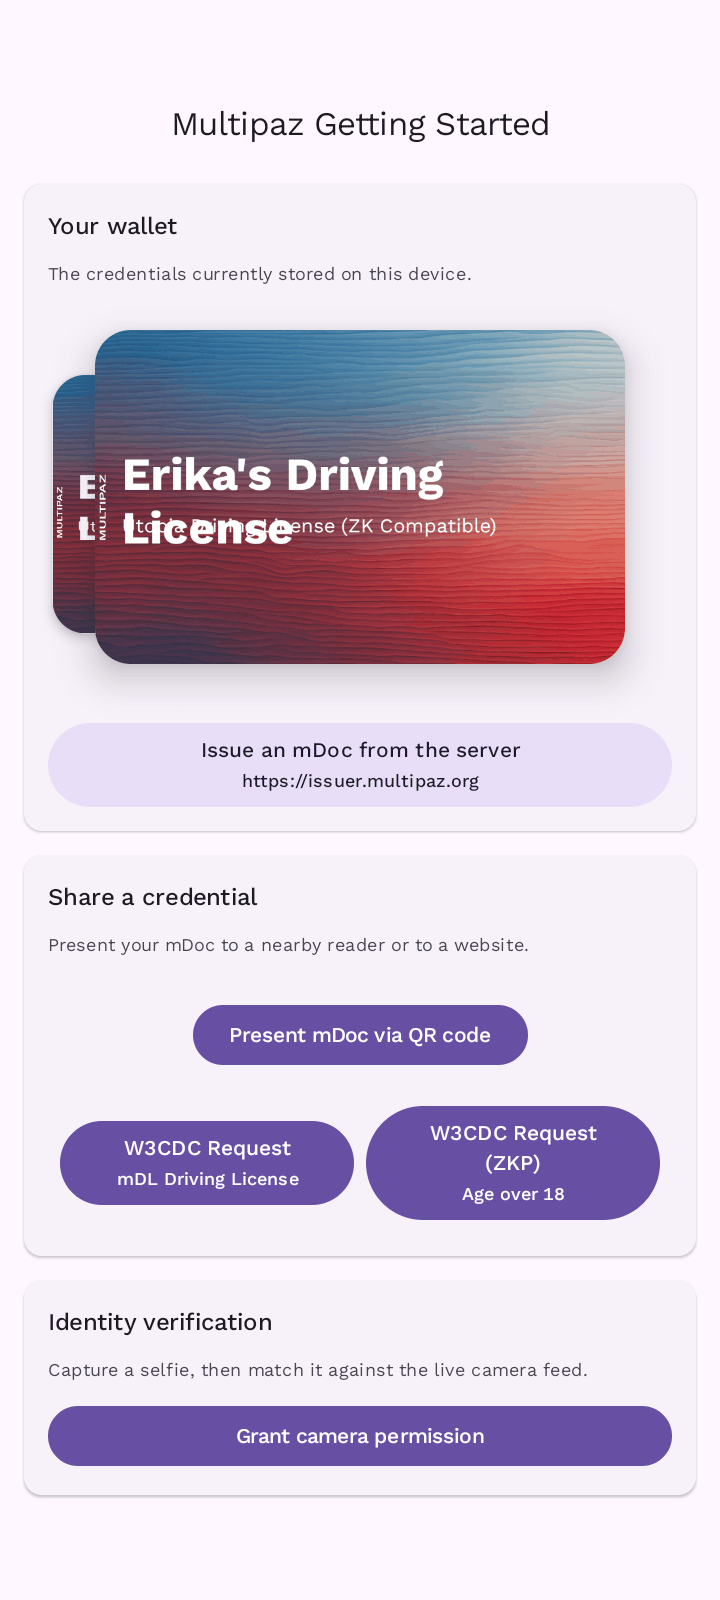
Run the app on an Android device (the W3C DC API is Android-only, as noted in the Native Verification guide). The Share a credential section now shows two request buttons:
- W3CDC Request - mDL Driving License — the regular disclosure flow.
- W3CDC Request (ZKP) - Age over 18 — the zero-knowledge flow.
To try the proof:
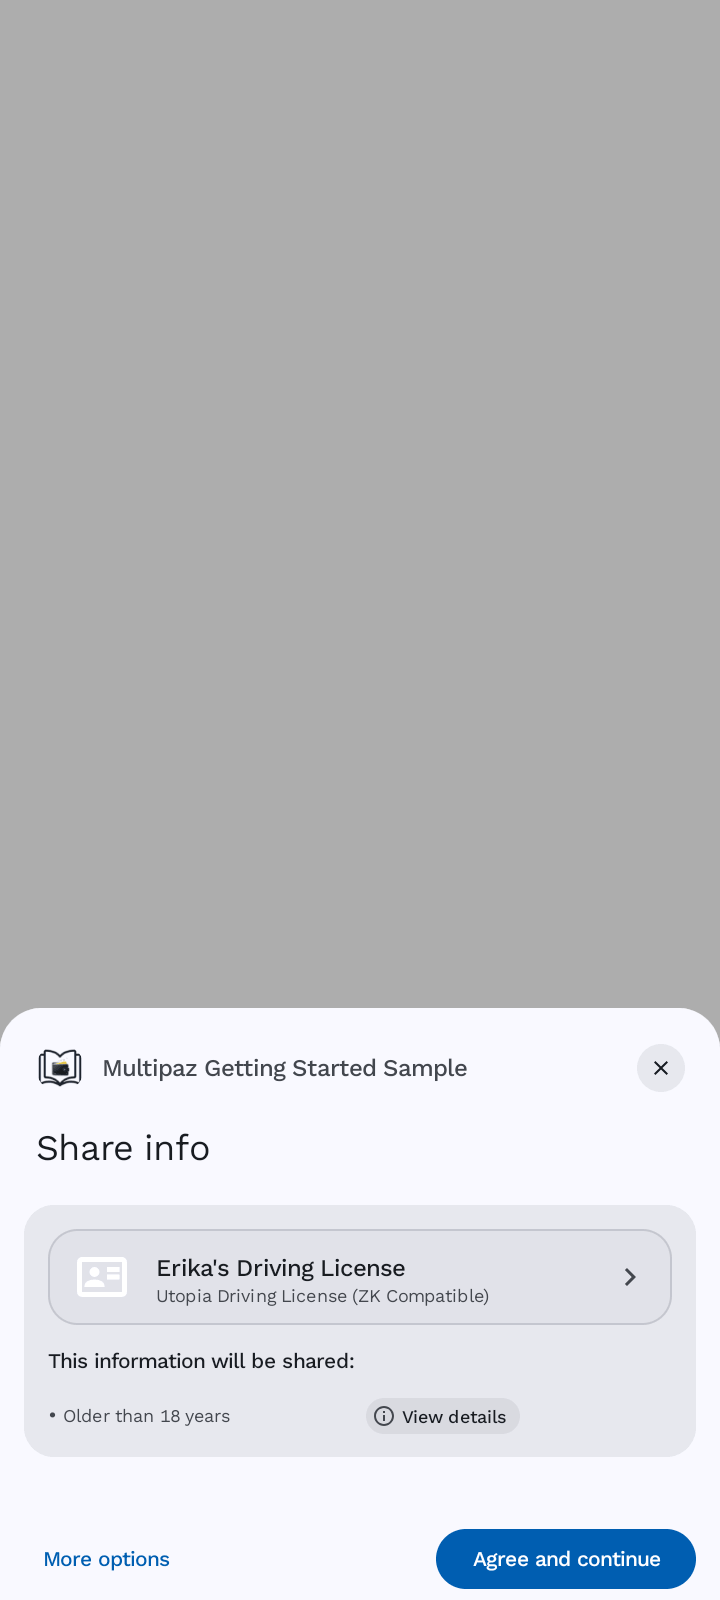
- Tap W3CDC Request (ZKP) - Age over 18.
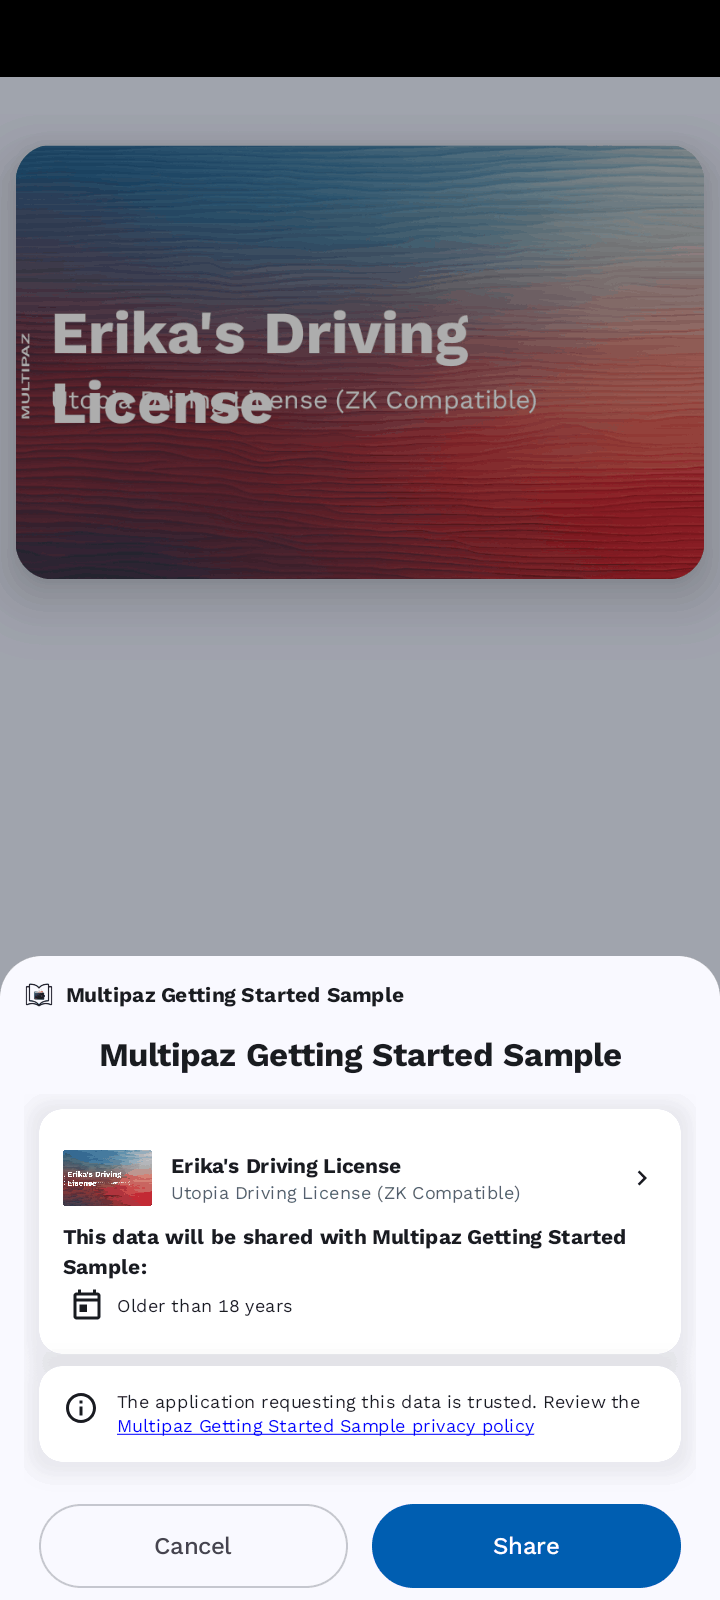
- When the system credential picker appears, choose the Utopia Driving License (ZK Compatible) credential and approve both the consent prompt and the biometric / password authentication.
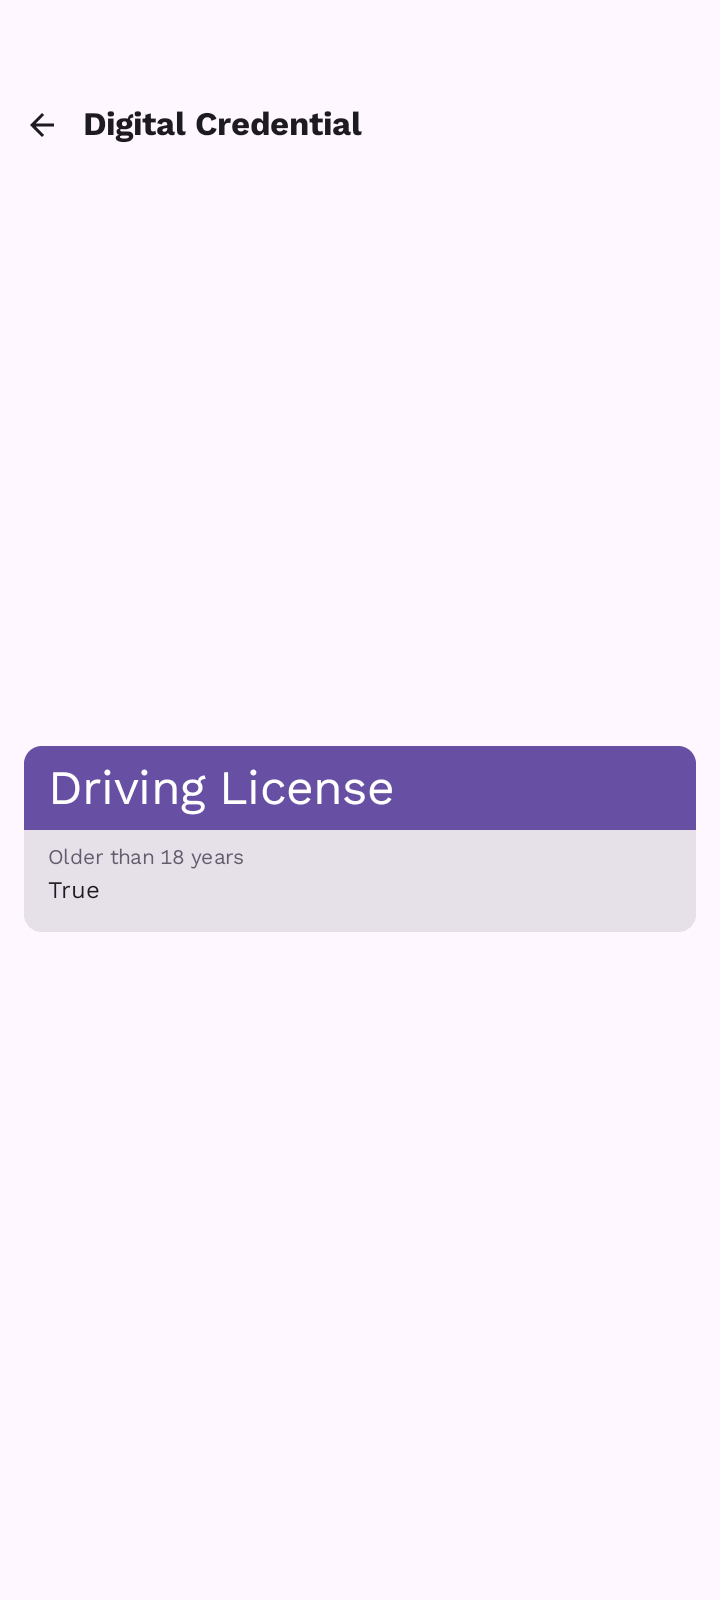
- The response screen validates the returned proof against the Longfellow circuit and displays the verified
age_over_18result - without the wallet ever disclosing the birth date, portrait, or the raw signed mdoc.
Demo Screenshots